Postman – check
business logic->Free for 3 Users –use in web or local-login using email
Collection of APIs-Left side
Dummy APIs site - https://jsonplaceholder.typicode.com/
We can add API manually or back end team will share(invite)
it via email
Steps
First create collection (Organize APIs module
wise)
2.
Click +
symbol (paste end point or URL)
3.
Params
( will add in name ex: ?name=Santosh)
4.
Some URLs will have Authorization (Basic AUth,API Key, Bearer token)
5.
Headers
contain metadata ( userid, content type)
6.
Body
( no need for get) -> click on Send
button àcheck
response code and time
Collection of APIs-Left side
Dummy APIs site - https://jsonplaceholder.typicode.com/
We can add API manually or back end team will share(invite) it via email
First create collection (Organize APIs module wise)
2. Click + symbol (paste end point or URL)
3. Params ( will add in name ex: ?name=Santosh)
4. Some URLs will have Authorization (Basic AUth,API Key, Bearer token)
5. Headers contain metadata ( userid, content type)
6. Body ( no need for get) -> click on Send button àcheck response code and time
7. Get
-200->retrieve Data (Http methods) – Back end team will
tell which method need to use
8.
Post-201 ->Create Data/resource -> (pass additional
data)->take JSON->body form data->params
9.
Put-200-> Update Data ->Update all parameters in a collection
10.
Patch->Update Data-> Update only one parameter
11.
Delete-200->Delete data
https://www.youtube.com/watch?v=f4iWq4jfVLA&t=120s&ab_channel=SaiGopi
https://www.softwaretestinghelp.com/rest-api-response-codes/
For
Example, for an Email client:
GET: read/inbox/messages – Retrieves the
list of all message under inbox
GET: read/inbox/messages/10
– Reads 10th message
in inbox
POST: create/inbox/folders
– Create a new folder under inbox
DELETE: Delete/spam/messages
– Delete all the messages under spam folder
PUT: folders/inbox/subfolder
– Update the information relating to the subfolder under inbox.
#1)
100 Series
These are temporary Responses
- 100
Continue
- 101
Switching Protocols
- 102
Processing
#2) 200 Series
The client accepts the Request, being processed successfully at the server.
- 200 –
OK
- 201 –
Created
- 202 –
Accepted
- 203 –
Non-Authoritative Information
- 204 –
No Content
- 205 –
Reset Content
- 206 –
Partial Content
- 207 –
Multi-Status
- 208 –
Already Reported
- 226 –
IM Used
#3) 300 Series
Most of the codes related to this series are for URL Redirection.
- 300 –
Multiple Choices
- 301 –
Moved Permanently
- 302 –
Found
- 303 –
Check Other
- 304 –
Not Modified
- 305 –
Use Proxy
- 306 –
Switch Proxy
- 307 –
Temporary Redirect
- 308 –
Permanent Redirect
#4) 400 Series
These are specific to client-side error.
- 400 –
Bad Request
- 401 –
Unauthorised
- 402 –
Payment Required
- 403 –
Forbidden
- 404 –
Not Found
- 405 –
Method Not Allowed
- 406 –
Not Acceptable
- 407 –
Proxy Authentication Required
- 408 –
Request Timeout
- 409 –
Conflict
- 410 –
Gone
- 411 –
Length Required
- 412 –
Precondition Failed
- 413 –
Payload Too Large
- 414 –
URI Too Long
- 415 –
Unsupported Media Type
- 416 –
Range Not Satisfiable
- 417 –
Expectation Failed
- 418 –
I’m a teapot
- 421 –
Misdirected Request
- 422 –
Unprocessable Entity
- 423 –
Locked
- 424 –
Failed Dependency
- 426 –
Upgrade Required
- 428 –
Precondition Required
- 429 –
Too Many Requests
- 431 –
Request Header Fields Too Large
- 451 –
Unavailable For Legal Reasons
#5) 500 Series
These are specific to the server-side error.
- 500 –
Internal Server Error
- 501 –
Not Implemented
- 502 –
Bad Gateway
- 503 –
Service Unavailable
- 504 – Gateway Timeout
- 505 –
HTTP Version Not Supported
- 506 –
Variant Also Negotiates
- 507 –
Insufficient Storage
- 508 –
Loop Detected
- 510 –
Not Extended
- 511
– Network Authentication Required
API is an acronym and it stands for Application Programming Interface. API is a set of routines, protocols, and tools for building Software Applications. APIs specify how one software program should interact with other software program.
In simple words, API stands for Application Programming Interface. API acts as an interface between two software applications and allows the two software applications to communicate with each other. API is a collection of software functions which can be executed by another software program.
What is Postman?
Postman is a collaboration platform for API development. It is a popular API client and it enables you to design, build, share, test, and document APIs.
Using the Postman tool, we can send HTTP/s requests to a service, as well as get their responses. By doing this we can make sure that the service is up and running.
Being originally a Chrome browser plugin, Postman now extends their solution with the native version for both Mac and Windows.
Why Postman?
Postman has become a tool of choice for over 8 million users.
- Free: It is free to download and use for teams of any size.
- Easy: Just download it and send your first request in minutes.
- APIs Support: You can make any kind of API call (REST, SOAP, or plain HTTP) and easily inspect even the largest responses.
- Extensible: You can customize it for your needs with the Postman API.
- Integration: You can easily integrate test suites into your preferred CI/CD service with Newman (command line collection runner)
- Community & Support: It has a huge community forum
Postman Installation:
We have installed the Postman app successfully. Now let’s start testing the API with Postman.
Postman is a good choice for API testing for those who don’t want to deal with coding in an integrated development environment using the same language as the developers.
Postman Features:
Some of the features Postman tool offers are as follows.
- Easy-to-use REST client
- Rich interface which makes it easy to use
- Can be used for both manual and automated API testing
- Can be run on Mac, Windows, Linux & Chrome Apps
- Has a bunch of integrations like support for Swagger & RAML formats
- Has Run, Test, Document and Monitoring Features
- Doesn’t require learning a new language
- Enable users to easily share the knowledge with the team as they can package up all the requests and expected responses, then send to their colleagues.
- Can be integrated with CI-CD tools like Jenkins, TeamCity etc.,
- Comes with a detailed API documentation
- API development & Automating API tests execution
Website: https://www.getpostman.com/
Pricing: Free – $21/user/month
It is a freemium tool. Its free version is more than enough to achieve basic requirements of API Testing.
How To Use Postman
All the components in the Postman tool have its own importance. Let’s see the different options of Postman workspace now.
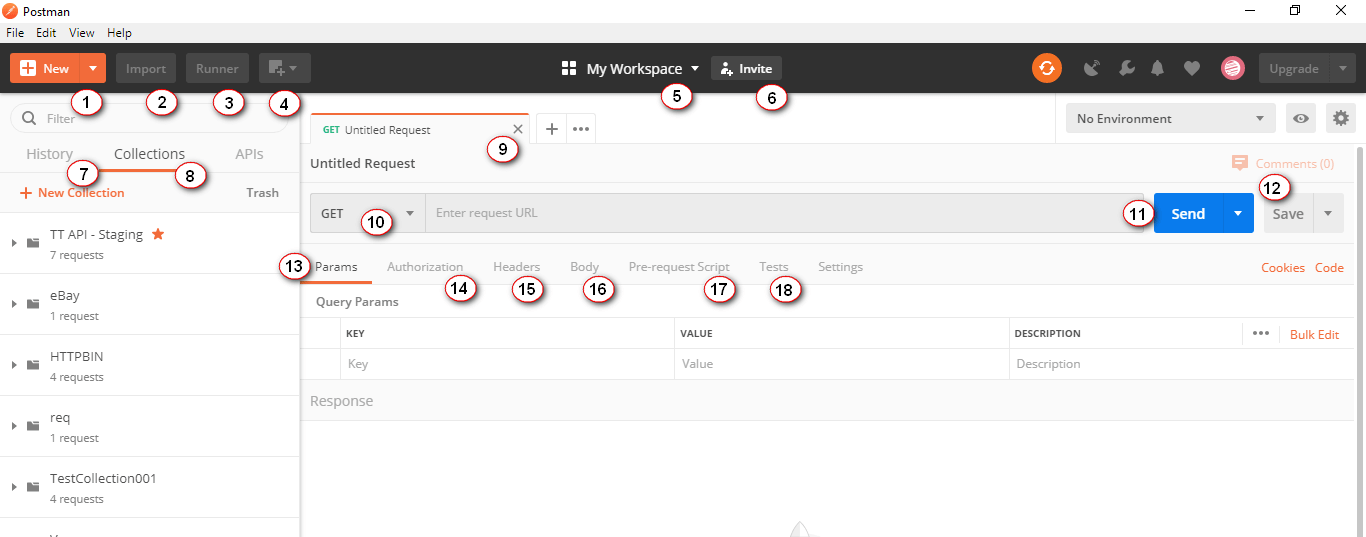
1. New: It is to create a new request, collection, or environment.
2. Import: It is to import a collection or environment. You can also find other options such as import from file, folder, link, or paste raw test.
3. Runner: We can execute automation tests using Collection Runner.
4. Open New: We can open Postman Window or Runner Window
5. My Workspace: It is your workspace. You can create a new workspace using this. A workspace is a shared context for building and consuming APIs. It allows real-time collaboration within and between teams.
6. Invite: It is to invite your team members to collaborate on a workspace.
7. History: Automatic saving of requests and responses in history which helps you track your past actions easily.
8. Collections: It is to organize and keep track of related requests.
9. Request tab: Title of the request you are working on. By default it is named as ‘Untitled Request’.
10. HTTP Request: You can see requests like GET, POST, COPY, DELETE, etc.
11. Request URL: Here we mention the link to where the API will communicate with. It is also known as endpoint.
12. Save: To save the request or to update the existing request.
13. Params: We mention the parameters (key values) needed for a request.
14. Authorization: APIs use authorization to ensure that client requests access data securely. We mention authorization details like username, password, bearer token etc., here.
15. Headers: Some APIs require you to send particular headers such as JSON, JavaScript etc., along with requests, typically to provide additional metadata about the operation you are performing. You can set these up here
16. Body: It allows you to specify the data you need to send with a request. You can send various different types of body data to suit your API.
17. Pre-request Script: Pre-request scripts are written in JavaScript, and are run before the request is sent. This is perfect for use-cases like including the timestamp in the request headers or sending a random alphanumeric string in the URL parameters.
18. Tests: Tests are the scripts executed during the request. Tests allow you to ensure that your API is working as expected, to establish that integrations between services are functioning reliably, and to verify that new developments haven’t broken any existing functionality.
Building Blocks of Postman:
Before testing an API, first we will see some building blocks of Postman Tool that are essential for every Postman operations.
- Requests
- Collections
- Environment
1. Requests:
A request is a combination of the URL, HTTP headers, Body or Payload. In the postman tool, you can save your requests and use them in the future based on your needs.
Click on New – Request

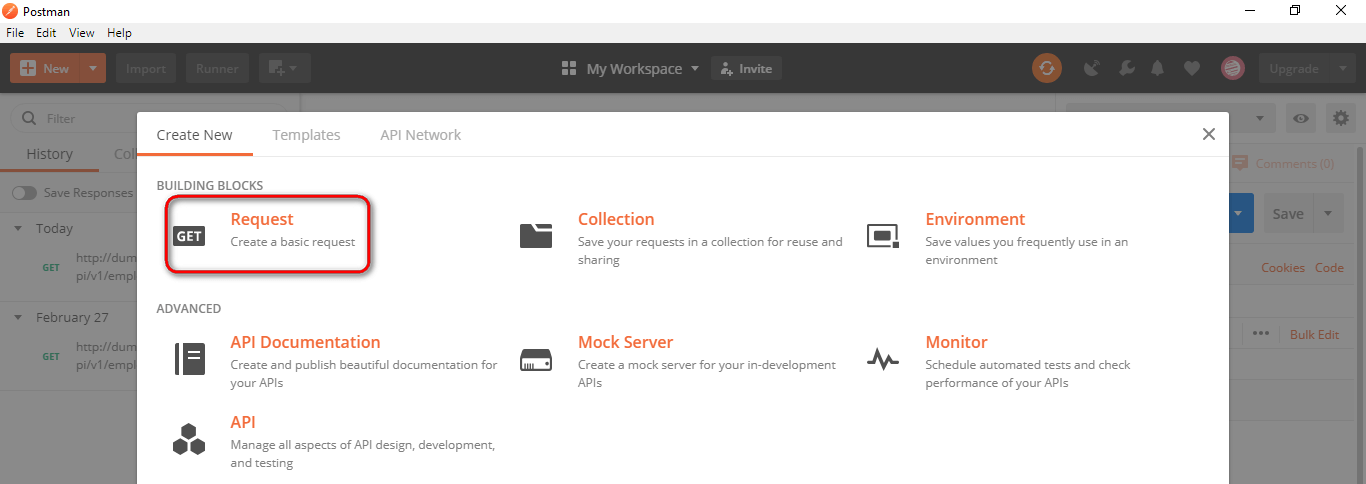
You can make requests to APIs in Postman. An API request allows you to retrieve data from a data source, or to send data. APIs run on web servers, and expose endpoints to support the operations client applications use to provide their functionality.
Each API request uses an HTTP method.
What is HTTP?
HTTP stands for Hyper Text Transfer Protocol. HTTP enables communication between clients and servers. Clients are often web browsers and Servers are often computers on the cloud.
If a client submits an HTTP request to the server, then the server returns a response to the client. The response sent by the server contains status information about the request and the requested content.
Most commonly used HTTP methods are as follows:
1. GET: GET method is used to retrieve data from an API.
2. POST: POST method is used to send new data to an API
3. PUT: PUT method is used to update existing data
4. PATCH: PATCH method is used to update existing data
5. DELETE : DELETE method is used to remove existing data.
Now let’s see how to create a simple request using Postman application and also see the various components of the request and its response.
Note: Here I use this Fake Online REST API for Testing and Prototyping
2. Collections:
Collections are a group of saved requests you can organize into folders. We can call it as a repository to save our requests.
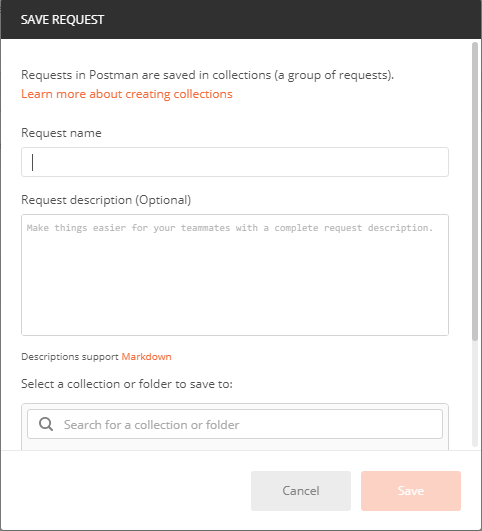
How To Create Collections in Postman:
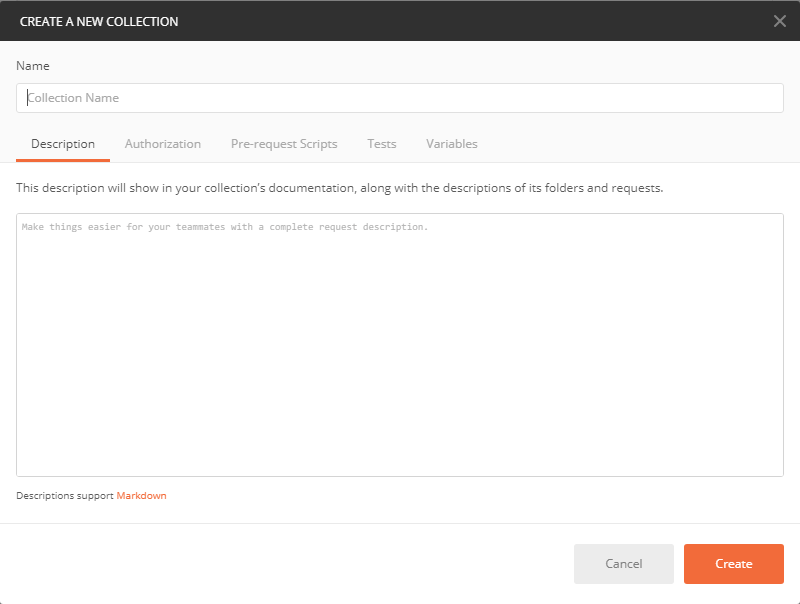
Click on New – Collection
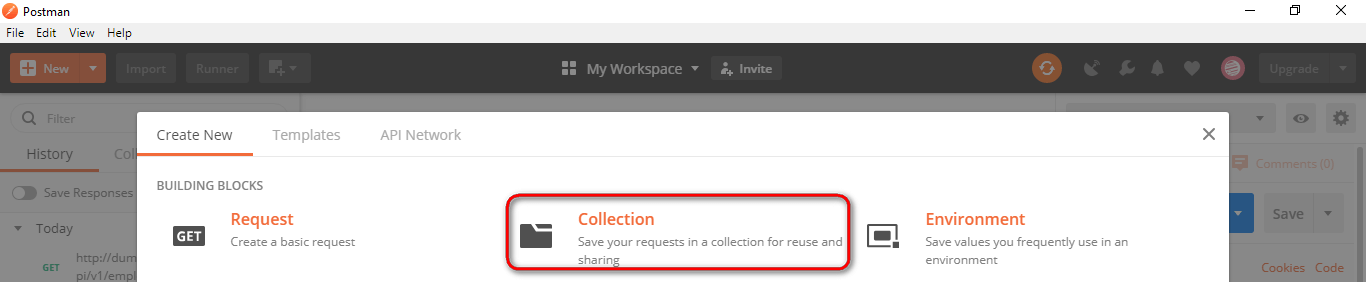
Input the Collection Name and description then click Create to create a new collection
You can add any number of requests in a Collection. You can run collections in Postman in two ways. 1. Using Collection Runner & 2. Using Newman. We will see running collections using Collection runner and Newman before closing this post.
Now, let’s see the third building block i.e., Environment.
3. Environment:
Environments in Postman allow us to run requests and collections against different data sets. We could have different environments for Dev, QA & Production. Each of these environments will have different configurations such as URL, token’s id and password, API keys etc., Environments are key-value pairs of variables. Each variable name represents its key. So whenever we reference a variable name then it allows us to access its corresponding value.
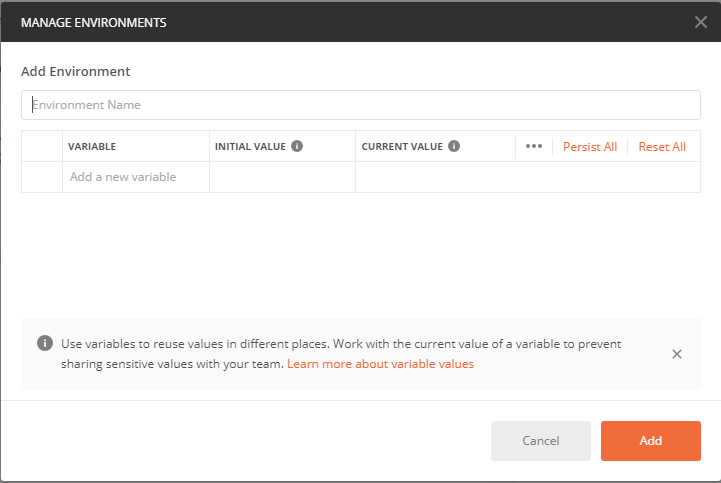
To create a new environment, we do as follows
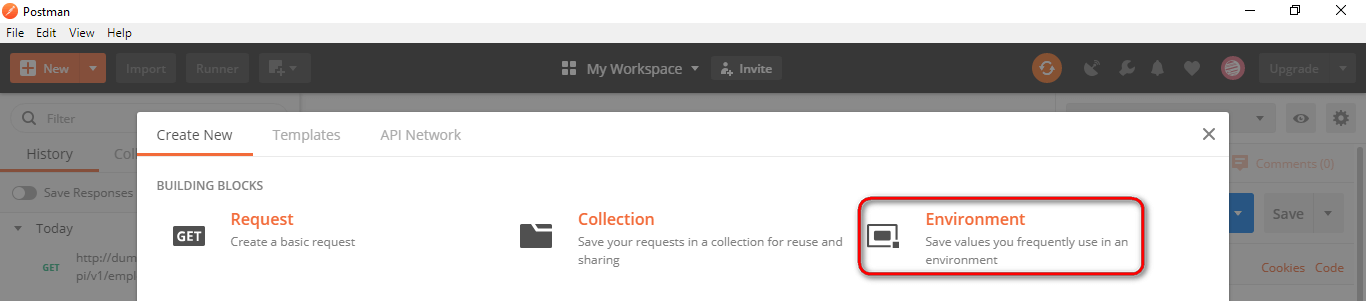
Click on New – Environment
Let’s see how to parameterize requests after we see how to test get requests and post requests
Testing Get Requests:
We have to use GET request to retrieve information from the given URL. With Get requests, there wont be any affect in the endpoint.
Open the Postman Application
I recommend you to sign-in to the Postman application to preserve all your actions such as requests, collections etc., for the future use. If not logged in, login with appropriate login credentials.
Here is the Postman UI initial screen.
Step 1: Click a New tab to create a new request.
Step 2: Creating a GET request for a REST API end point
- Set your HTTP request to GET
- Input the link in request URL (https://jsonplaceholder.typicode.com/users)
- Click on SEND to execute the request to the server hosting the endpoint
- You can see 200 OK message in the screenshot below because our request is successful. In some cases, GET requests may be unsuccessful due to an invalid request URL or incorrect authentication.
You should be able to see various data around the response after the server responds in the Body section
In the above screenshot under the request headers, we can see response status code, time taken for the request to complete, the size of the payload
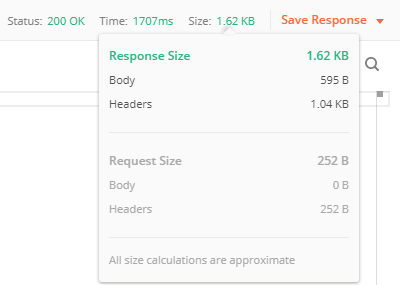
We can find the details about the response time and response size by hover over them.
Response time: We can see individual components like Connect time, Socket time, DNS lookup, etc.,
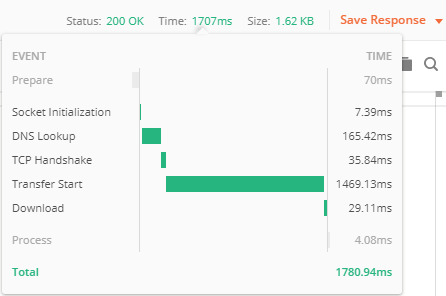
Response size: We can see individual components like actual response size, how much size the headers are constituted etc.,
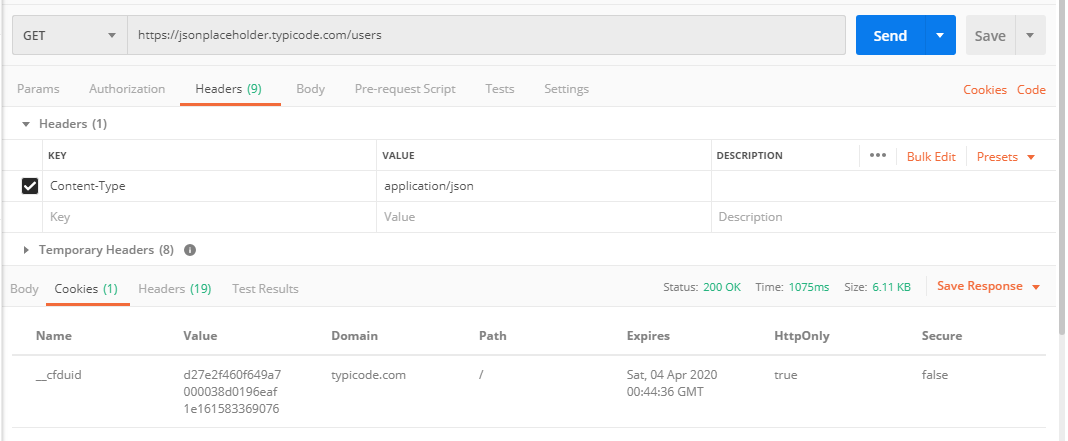
Cookies: We can find session related information in the cookies that were returned from the server.
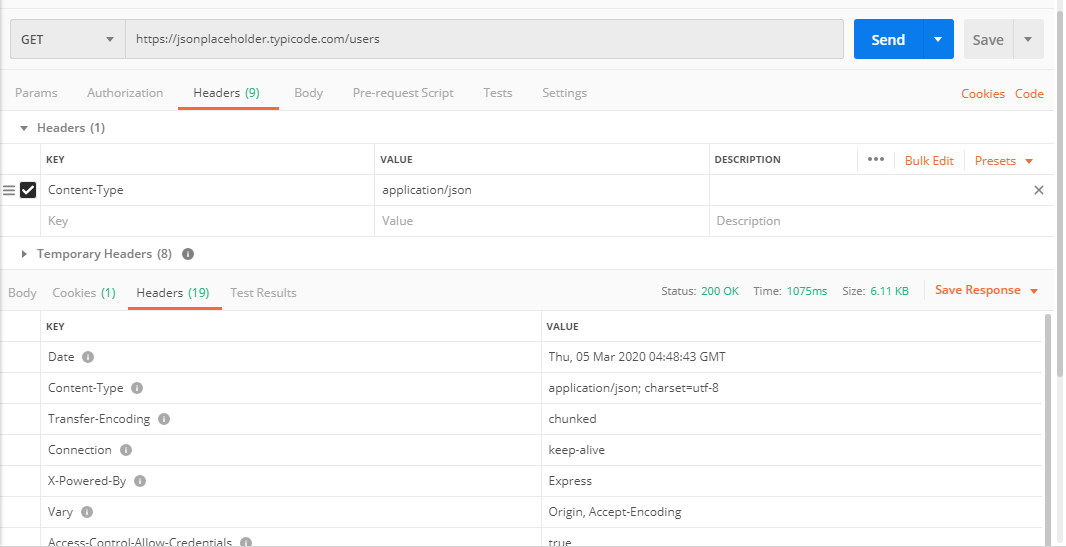
Response header: Here we can find information about the request that got processed.
Testing Post Requests:
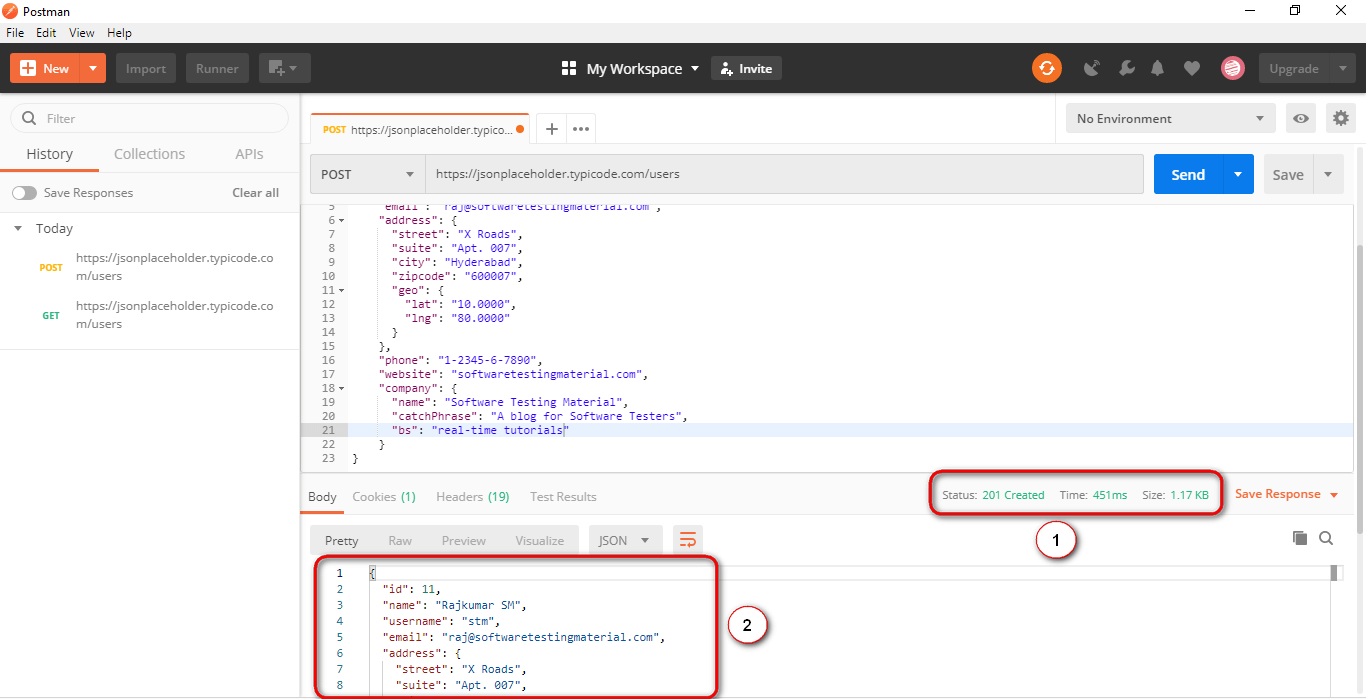
Post requests are used to do data manipulation by adding data to the endpoint. Now, let’s add a user into the application. To do this, we need to send data to the application. We use POST request to send data. In POST request we send data in the body of the request and API returns some data in response to the POST request to us which validates the user has been created. We use the same data which we used in GET request to add a new user.
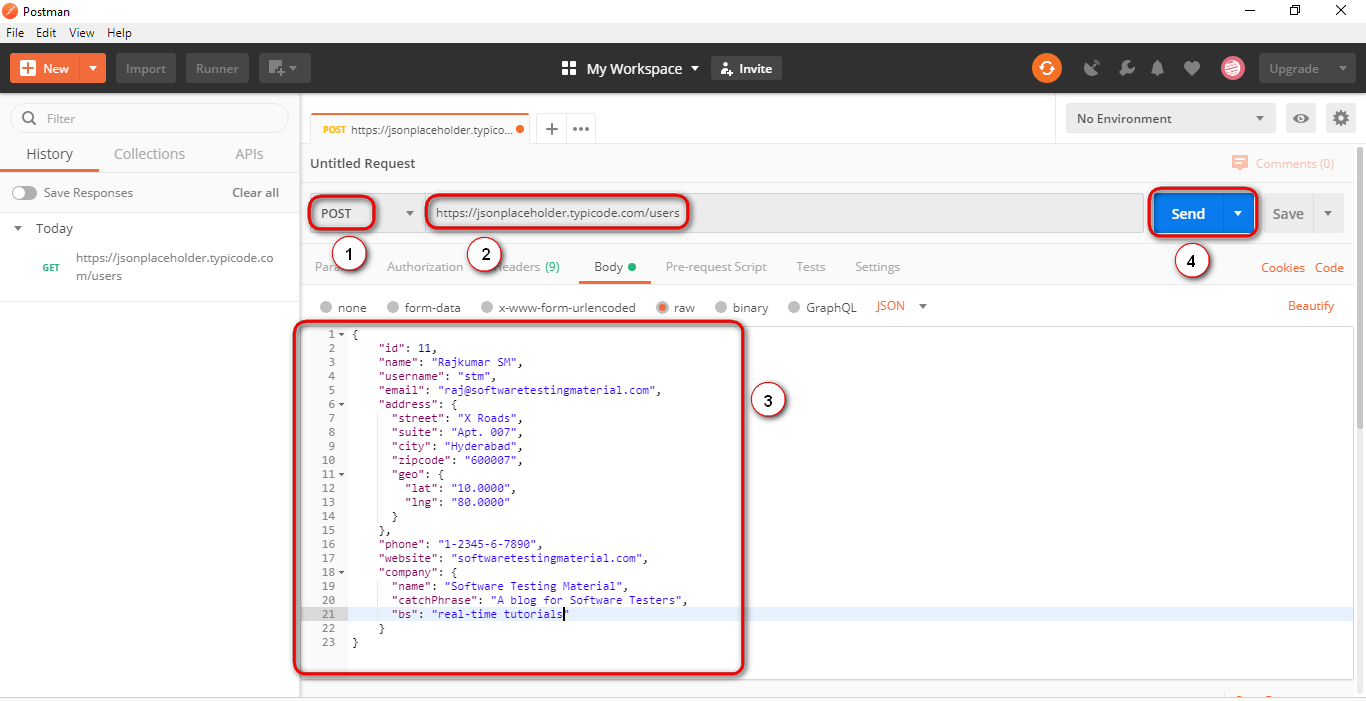
- Set your HTTP request to POST
- Input the link in request URL (https://jsonplaceholder.typicode.com/users)
- Click on Body Tab and select “Raw” radio button – Select JSON – Copy and paste just one user result from the previous get request as shown in the below screenshot.
{ "id": 11, "name": "Rajkumar SM", "username": "stm", "email": "raj@softwaretestingmaterial.com", "address": { "street": "X Roads", "suite": "Apt. 007", "city": "Hyderabad", "zipcode": "600007", "geo": { "lat": "10.0000", "lng": "80.0000" } }, "phone": "1-2345-6-7890", "website": "softwaretestingmaterial.com", "company": { "name": "Software Testing Material", "catchPhrase": "A blog for Software Testers", "bs": "real-time tutorials" } } - Click on SEND to execute the request to the server hosting the endpoint
Note: You can use Jsonformatter to check the correct format of the data you are trying to post.
- You can see 201 Created message in the screenshot below because our request is successful.
- You can see the posted data in the body.
Likewise, we will test other requests PUT, PATCH & DELETE
Note: For every request, you need to check expected result, status code, response time. Also don’t forgot to do negative tests to verify whether the API is responding properly or not
How To Parameterize Requests:
If we want to parameterize postman requests, we need to do as follows.
Data Parameterization is one of the most useful features of Postman.
Many times, we use same request multiple times with different data. By using Parameterization we can use variables with parameters. We can save the data in an environment variable or in a data file.
In Postman, parameters are crated through the use of double curly brackets say “{{test}}”
For example, I have a base URL say https://stm.org and I have stored in a variable named base_url. In this case I do reference it in my requests using {{base_url}}. To send a request to this base URL (ie., https://stm.org) to get new customers list, I do list this base URL as part of the request URL using {{base_url}}/get?customers=new. The request will be sent to https://stm.org/get?customers=new by postman.
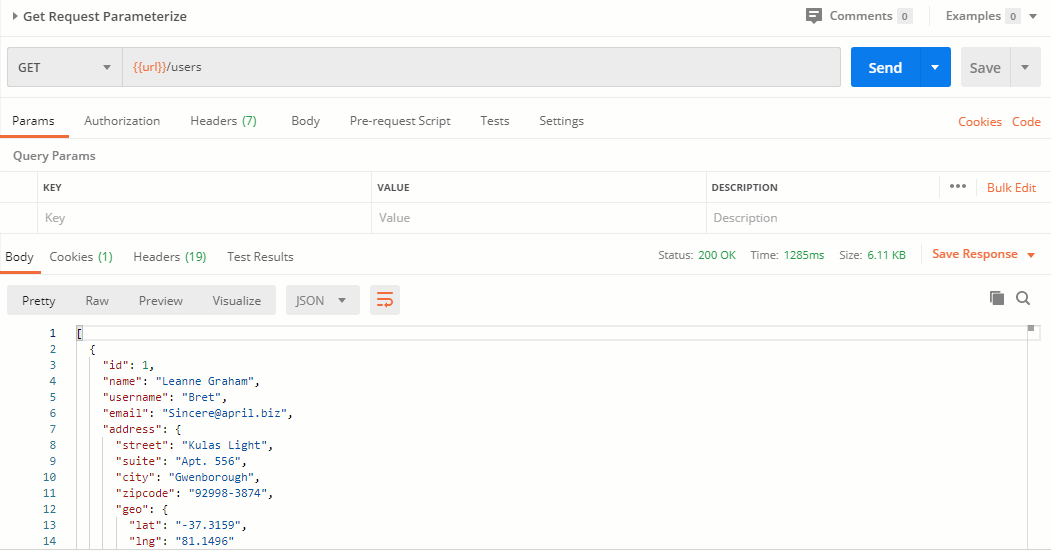
1. Set the HTTP request to GET and input the URL

2. Replace the URL with a parameter such as {{url}}. Request URL should be {{url}}/users.

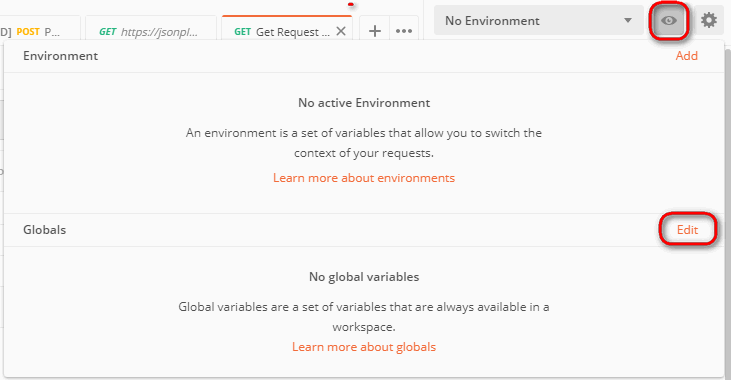
3. Now we need to set environment variables to set Parameters. To do click on the eye icon and click edit to set the variable to a global environment variable to use it in all collections
4. In variable, set the name to the url which is https://jsonplaceholder.typicode.com and click Save.
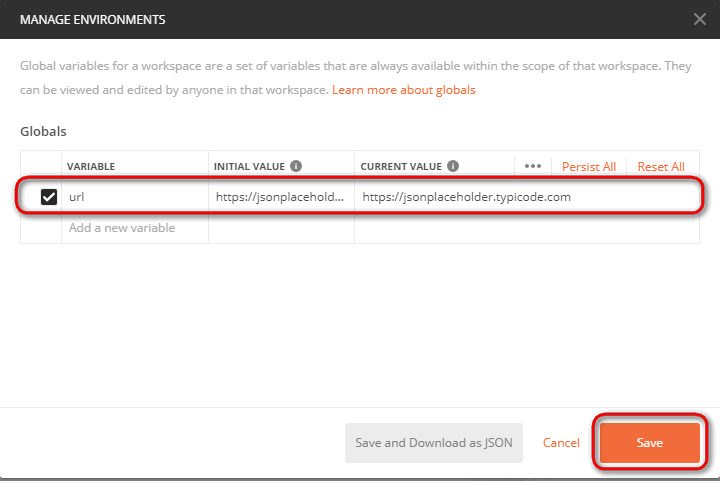
Note: Click close if you see the next screen
5. Go back to GET request and click send.
How To Create Postman Tests:
Postman Tests allow you to ensure that your API is working as expected. It is to establish integrations between services are functioning reliably, and to verify that new developments haven’t broken any existing functionality. It helps you verify results such as successful or failed status, comparison of expected results etc.,
Let’s start with some basic tests.
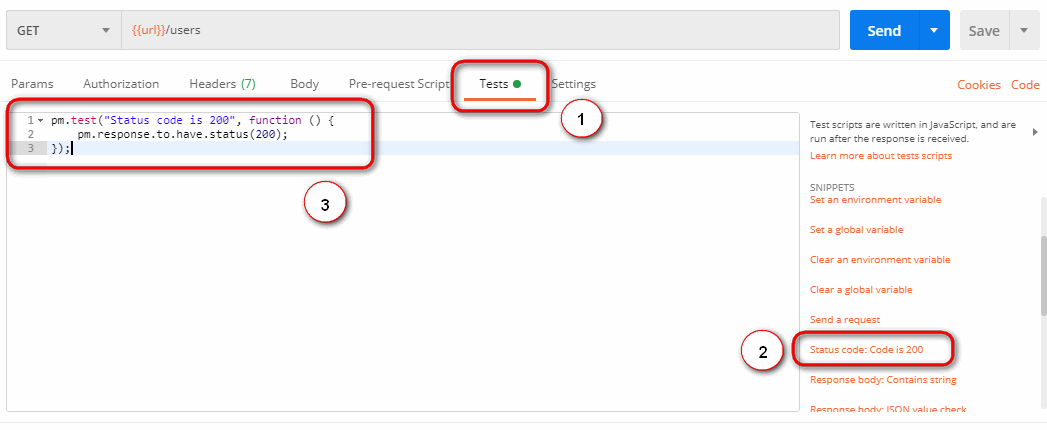
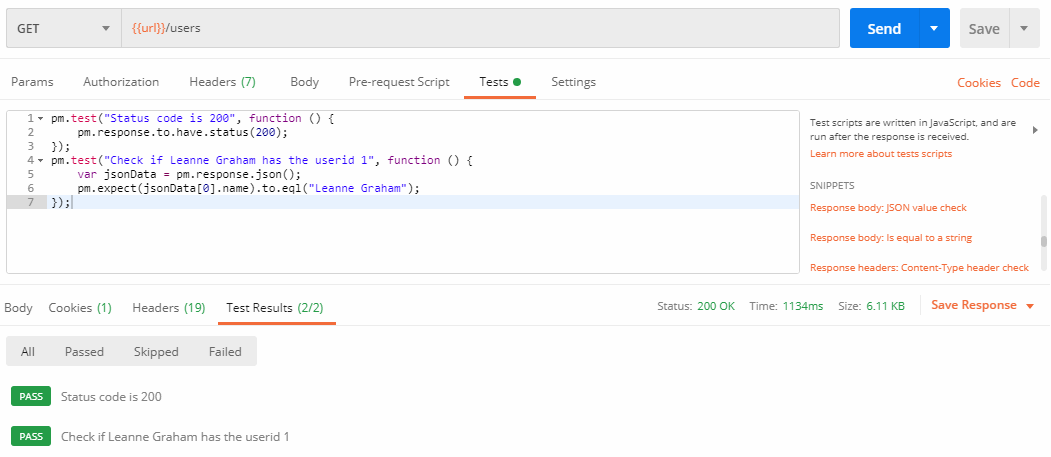
1. Go to the GET request which we created earlier. and switch to the tests tab. From the snippets section, click on “Status code: Code is 200”. Script will be auto-populated.
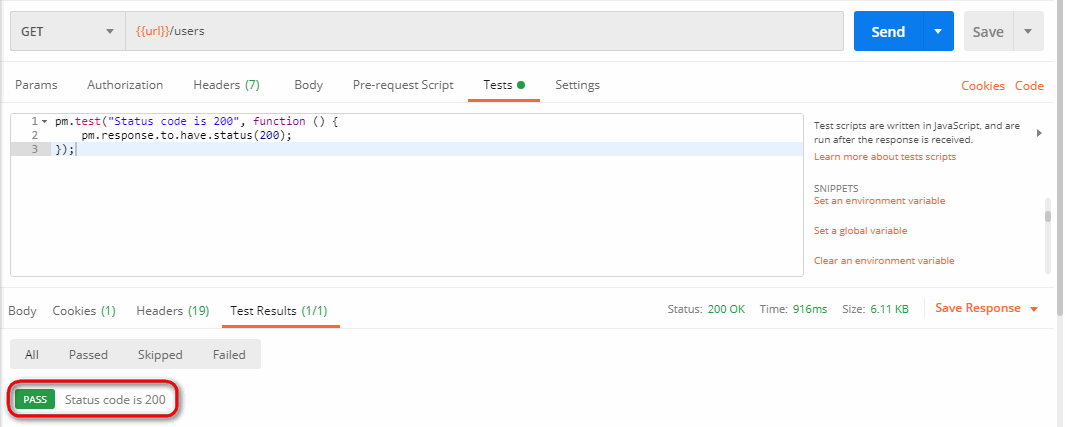
2. Click on Send. The result will be displayed.
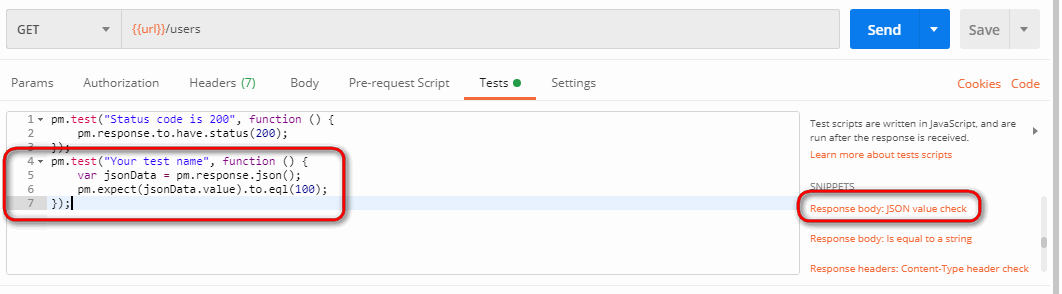
3. Let’s add another test. In this test, we do compare the expected result to the actual result. To do this, click on “Response body:JSON value check” from the snippets section. Let’s check if Leanne Graham has the userid 1.
4. To specify the test name exactly what we want to test, simply replace “Your Test Name” from the code with “Check if Leanne Graham has the userid 1”. Also replace jsonData.value with jsonData[0].name. To get the path (It is there in the body of earlier GET result). Since “Leanne Graham” is userid 1, jsonData is in the first result which should start with 0. To get the second result, use jsonData[1] and so on for succeeding results.
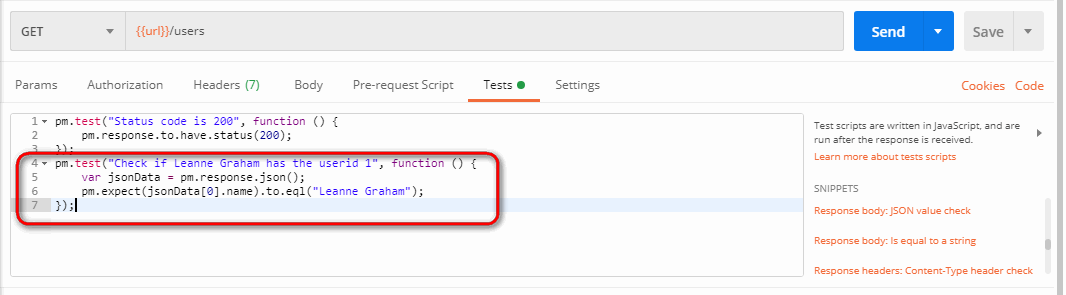
pm.test("Check if user with id1 is Leanne Graham", function () {
    var jsonData = pm.response.json();
    pm.expect(jsonData[0].name).to.eql("Leanne Graham");
});
5. Click send.
We can create tests depends on our requirement. Explore the tools by trying different tests.
How To Run Collections using Collection Runner:
Let’s run the collection using collection runner
1. Click on the Runner button which is located next to the Import button.

2. Collection Runner page should appear
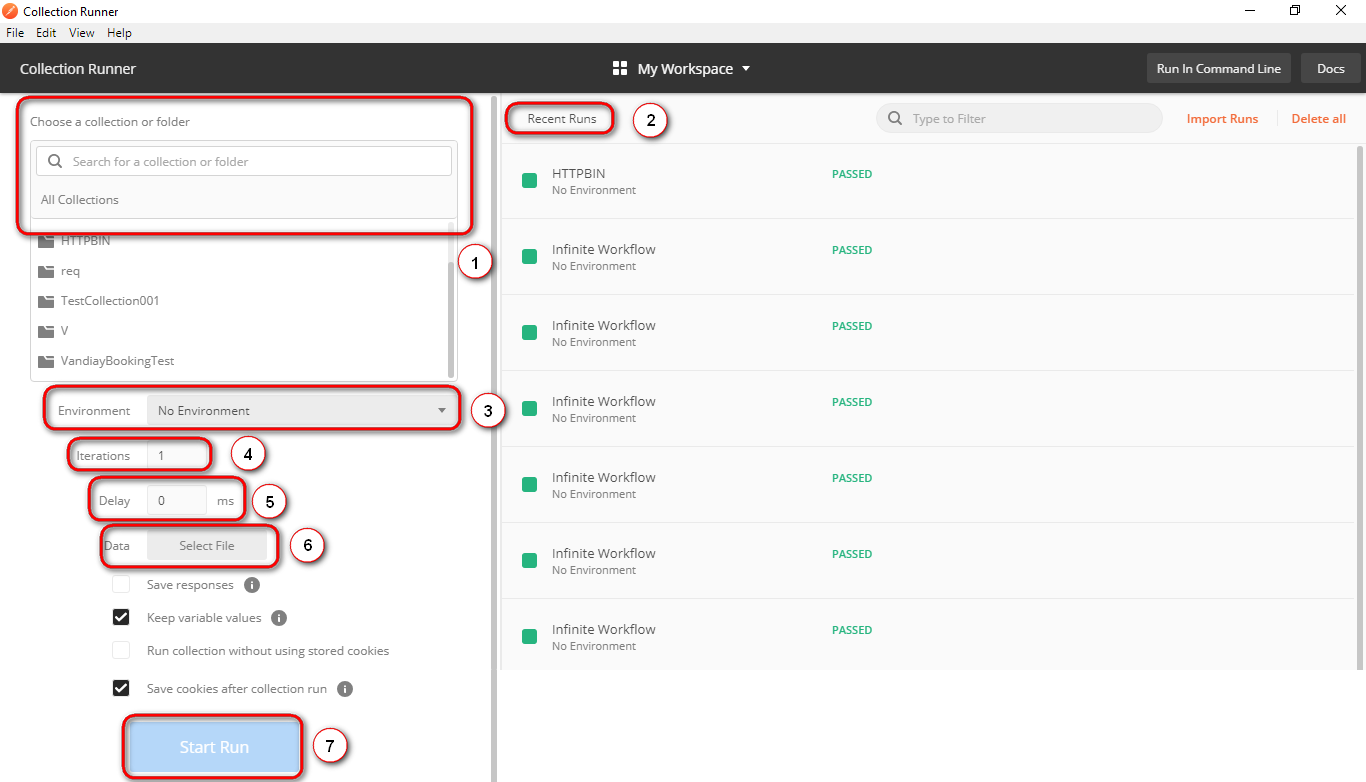
- 1. All you recent runs
- 2. If you are using specific environment then you need to select that environment
- 3. You have to set the number based on how many times you want to iterate it
- 4. Tests without delay may cause errors, so set the delay time
- 5. State how you would like to log responses
- 6. Select your data file
- 7. To run the collection
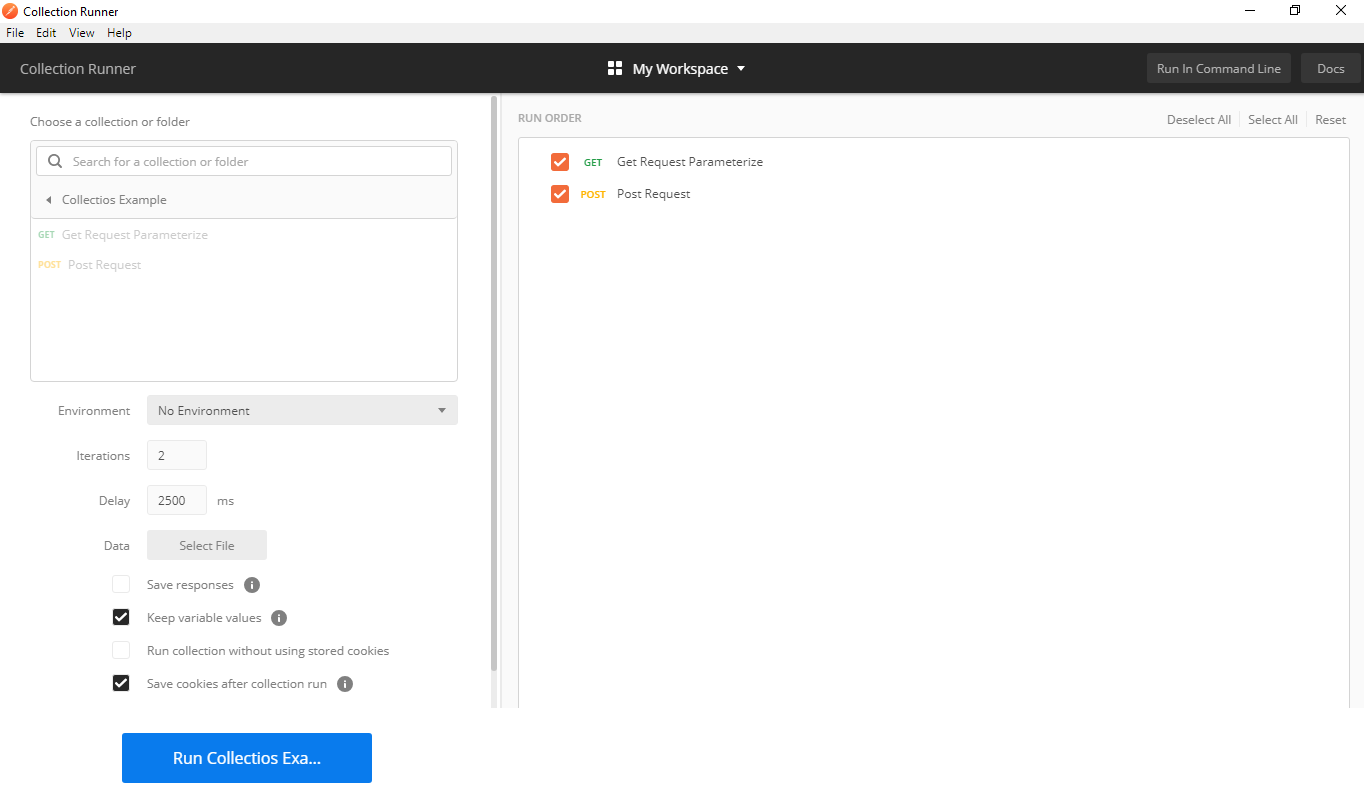
3. You can add select collection here. You have to select the subfolder incase of any subfolders available. Run Postman Test Collection by setting up iterations as 2, delay as 2500 ms, and click on Run Postman Test button
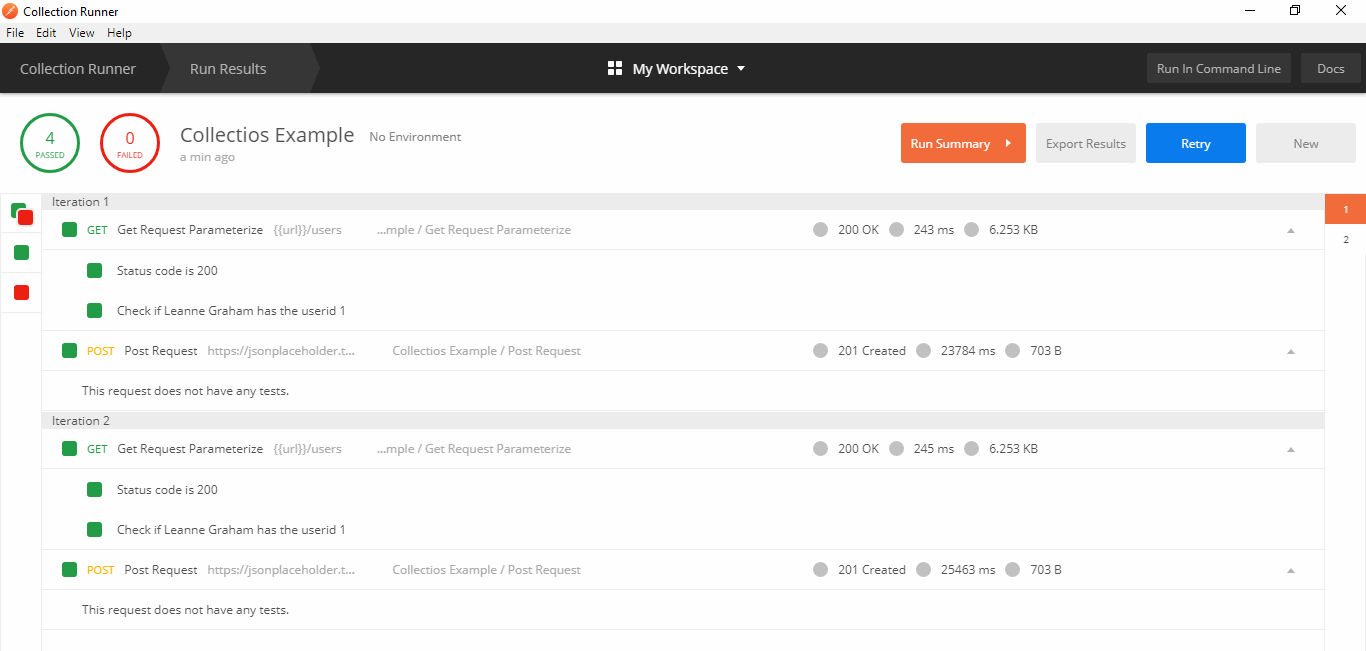
4. You can see the test status after the tests have executed. Here we have added both GET & POST requests but we didnt have POST requests. So you see a message for POST requests as “This request doesn’t have any tests”.
How To Run Collections using Newman:
To run our collection using Newman do the following.
1. Install node.js using this link
2. Open the command line and enter npm install -g newman
3. Go to the Postman workspace after the Newman is installed. In the collections box, click on the three dots and select Export.
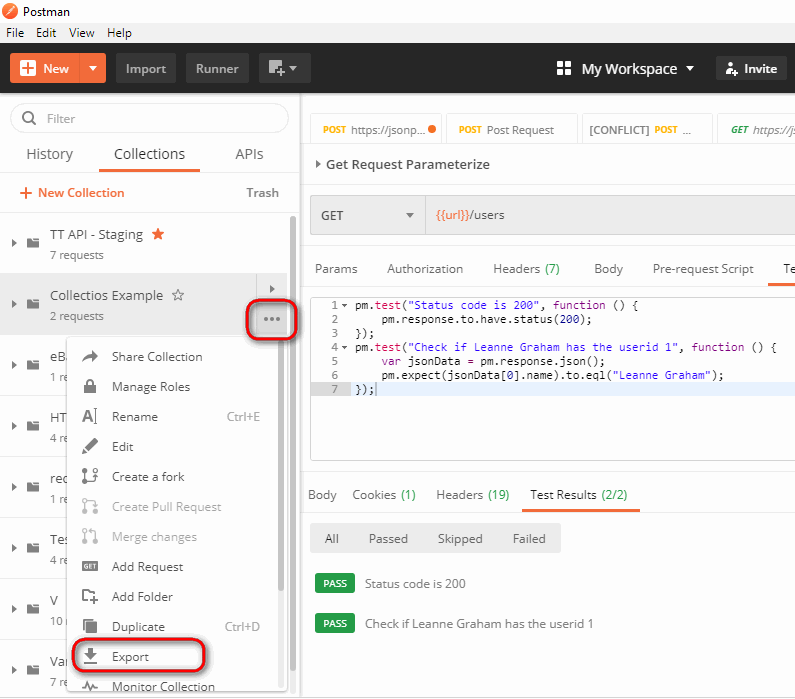
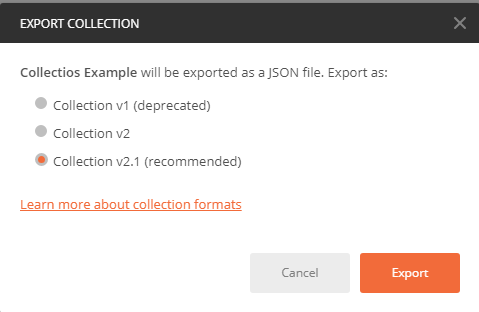
4. Choose Export Collection as Collection v2.1 (Recommended) then click Export.
5. Select your desired location then click Save. It is advisable to create a specific folder for your Postman tests. A collection should now be exported to your chosen local directory.
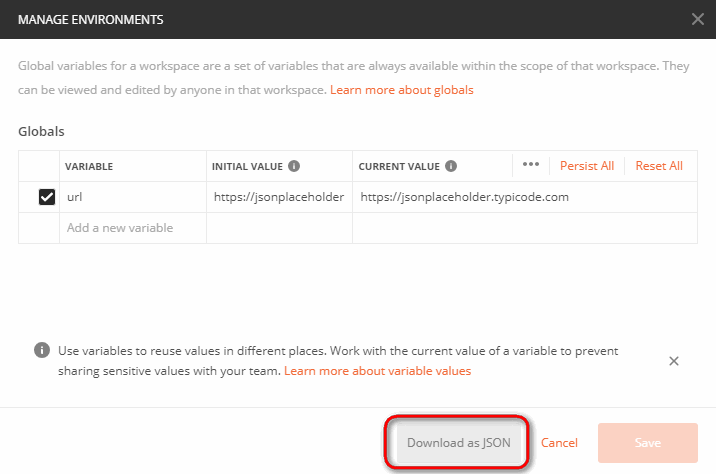
6. We will also need to export our environment. Click on the eye icon beside the environment dropdown in Global, select Download as JSON. Select your desired location then click Save. It is advisable that the environment should be in the same folder as your collection.
7. Environment should now be exported to the same local directory as Collection.
8. Now go back to command line and change the directory to where you have saved the collection and environment.
cd C:\Users\Asus\Desktop\Postman Tutorial
9. Run your collection using this command:
newman run PostmanTestCollection.postman_collection.json -e Testing.postman_globals.json
Run results should now appear.
Conclusion:
In this Postman Tutorial for beginners, we have covered the most important topics. I hope you have learned how to install postman and create simple requests and check the response time and other details and also learned how to run collections using Collection Runner & Newman. In the next post, we will cover the advanced topics of the Postman tool.

No comments:
Post a Comment